Tuesday, May 31, 2011

Happy Hair Clips part 2


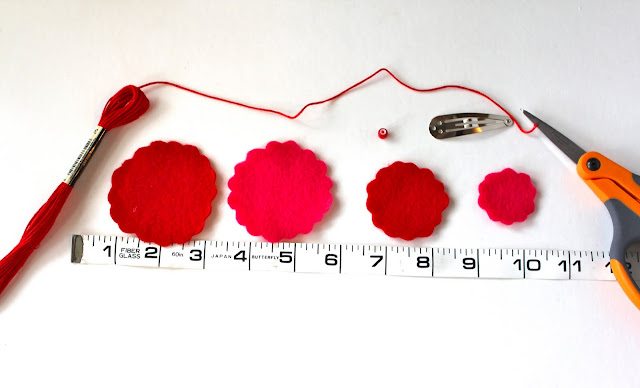
Here's the 2nd Clip in this little series: "Felty Flowers"


Materials Needed: assortment of colored felt, beads, embroidery floss, hot glue, metal hair clip

Steps:
1. Cut out several different sized circles, then cut out lots of petals (the bigger the better, in my opinion)
2. Layer the flowers then sew through the bead to secure all the layers
OR just Hot glue each layer together and glue on a button/bead on top
3. Sew on the metal clip
4. Put a dab of hot glue under the clip where you have just sewn
5. Put a dab of hot glue on the the other tip of the hair clip to secure to the flower


Once again, clip onto a little girl or onto your own hair and enjoy and if you'd like one of these clips, i'd be happy to send one to you, just  let me know! :)


Monday, May 30, 2011

"super hero' Fort Kit

I was so thrilled when i came across this great birthday gift idea a few months ago. When Will got invited to a "Super Hero" birthday party this last weekend i knew we had to make one for his friend.

It was pretty easy to put together once i located the right places to get all the stuff and thrifty too!
Here's a run down of what's included:
-2 Twin sheets: ARC for about $2 each
-Ties on the Sheet: old XL T-shirt 
-Rope: Hobby lobby for about $2
-Flash Light: Dollar Store $1
-Clamps: Dollar Store $1
-Glow Sticks: Dollar Store $1
-Clothes Pins: Dollar Store $1
-Suction Cups: Dollar Store $1
-Lightening Bolt bag: Some cheap gray fabric, yellow felt $2

TOTAL: $13.00
And thanks to  SISTER who printed out this tag for me.  I discovered that my printer was out of ink 15 minutes before we needed to leave for the party. :)


linking to: Skip to My Lou and SugarBee

Friday, May 27, 2011

too much? (a picture card idea)

Ok, so i seriously hesitated posting these in fear you all might think i purposely try to make my children cry just to get a good picture. Well, i don't and i really wouldn't let them suffer (for too long) no matter how cute. ;) That said, here are a few pictures i took this week for a birthday card for my mother in law. While i was editing i couldn't help laughing, but then the little munchkin looked so pathetic it almost made me cry too. :) 
Well, anyway, it made for a memorable card!

Oh, but one more thing, for the record, Ben really, truly is still the best, happiest, sweetest little baby the world has ever seen. I just happened to document his 2.5 sad minutes of the day. for the record. ;)
Alright already, that's my last apology. enjoy! ;)


 hey! maybe life isn't so bad?!
 look! that's almost a smile! Ben might be pulling it together...
 well......
 nevermind.

 sweet big brother gives a little notice to the sad munchkin
 look at that lip!
 come on, buddy! life isn't so bad!


awwww, all done. hugs and kisses comin' your way Baby Ben!

Wednesday, May 25, 2011

Happy Hair Clips part 1


Well hello there, this is the first in a little series of hair accessory ideas. I plan to share several variations of hair clips throughout the next week or two. Keep checking back!

**Oh, and since only one of my girls will allow any fun clips in her hair, i'd love to pass on a few to YOU. If you'd like one, just leave a comment and i'll see how many i can make and send out as the series goes on. :)

Here's the first one: "Color Burst Clip"

Materials: tulle, thread, small piece of fabric, poly-fill, metal hair clip

1. Fold tulle in half twice so it is has 4 layers, then cut a strip about 18 inches long and 3-4 inches wide
2. Gather the tulle by hand or machine leaving about a 1/4inch edge
3. Tie the ruffled/gathered tulle to form a tight circle
4. Cut a 3x3 inch square of fabric
5. Roll a big chunk of poly-fill into a tight ball
6. Wrap the fabric around the ball and sew to create a little pouch-type ball
7. Stuff the little fabric ball through the hole in the tulle circle and hot clue the edges to keep it in place
8. Sew the metal clip onto the back, hot glue the top to make it more secure.


Tie the two ends together tightly


Push the bundle all the way through the center of the tulle

Hot glue around the edges and squish the tulle into the fabric bundle

Trim the tulle if you'd like and trim the extra fabric

Sew the metal clip to the back, through the little hole in the hair clip.
Put a dab of hot glue on the back to make it extra secure.

Clip onto a little girl and enjoy!

Saturday, May 21, 2011

just keep smiling...


Me- "Hey guys, the picture i just took (when everyone was still happy) was dark, let's take one more before we start your movie, look here! SMILE!" 
Sophie has a pretty low tolerance for yelling (except when she's the one doing the yelling)

It finally started to get to Madeline....Will was still going strong! just keep smiling, just keep smiling...

Will- "Hey, what about our movie?? Oh. Ben is still crying."


Will-"here, tickle, tickle....Ok, he's happy, look, we're smiling. hurry, take the picture so we can start the movie" hahaha!

Don't worry, i rescued the little munchkin, and the other 3 for that matter. :)

Wednesday, May 18, 2011

thrifty thursday: globes, globes and more globes


I'm trying this post again after blogger went kooky last thursday....ANYWAY, here are the two lovely little globes i found last week.
And here are some reasons why i was excited to see my collection grow. 


ttp://lovelydesign.blogspot.com

potterybarnkids

unknown source
http://www.beckynovacekphotography.com/


ashleyannphotography